Procedure for Determining Air Content of Concrete:
1. Dampen the interior of the bowl and place on a flat, level, firm surface.
2. Using a scoop, place the concrete in the measuring bowl in the required number of layers, moving the scoop around the perimeter of the bowl opening to ensure an ev
 en distribution of the concrete.
 3. For the first layer: fill the bowl approximately 1/3 of its volume; rod the layer 25 times throughout its depth, using care not to damage the bottom of the measuring bowl. Distribute the roddings uniformly over the cross section of the bowl; tap the outside of the bowl smartly 10 to 15 times with the mallet to close voids left by the tamping rod.
4. For the second layer: fill the bowl approximately 2/3 of its volume; rod the layer 25 times, penetrate the first layer about 1 in. (25 mm), evenly distribute the roddings over the cross-section of the bowl; tap the outside of the bowl smartly 10 to 15 times with the mallet to close voids left by the tamping rod.
5. For the third layer: add concrete in a manner to avoid excessive overfilling; rod the layer 25 times, penetrate the second layer about 1 in. (25 mm), evenly distribute the roddings over the cross-section of the bowl; tap the outside of the bowl smartly 10 to 15 times with the mallet to close voids left by the tamping rod.
6. Strike-off the top layer of concrete: if using a strike-off plate while performing C138, press the strike-off plate on the top surface of the measure to cover 2/3 of the surface and withdraw the plate with a sawing motion to finish only the area originally covered; place the plate on top of the measure to cover the original 2/3 of the surface and advance it with a vertical pressure and a sawing motion to cover the whole surface of the measure and continue to advance it until it slides completely off the measure; incline the plate and perform several strokes with the edge of the plate to produce a smooth finish.
7. Strike-off the top layer of concrete: If using a strike-off bar while performing C231, strike-off the top surface by sliding the strike-off bar across the top flange or rim of the measuring bowl with a sawing motion until the bowl is just level full.
8. Thoroughly clean the flange/rim of the bowl and cover assembly.
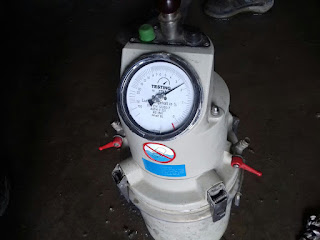
9. Clamp the cover to the bowl ensuring a pressure-tight seal.
10. Close the main air valve between the air chamber and bowl. Open both petcocks on the cover.
11. Use a syringe to inject water through one petcock until water emerges from the opposite side petcock. Jar the meter gently until all air is expelled.
12. Close the air bleeder valve and pump air into the air chamber until the hand of the dial gauge is on the initial pressure line. Allow a few seconds for the compressed air to cool.
13. Stabilize the gauge hand at the initial pressure line by bleeding, pumping and lightly tapping the gauge by hand.
14. Close both petcocks.
15. Open the main air valve between the air chamber and bowl. Tap the sides of the bowl smartly with the mallet. Lightly tap the pressure gauge by hand to stabilize the gauge hand.
16. Read the percentage of air on the dial of the pressure gauge.
17. Close the main air valve and then release the pressure in the bowl by opening both petcocks before removing the covers.
18. Report the air content to the nearest 0.1% using the aggregate correction factor (or to the nearest ½ scale division if the gauge reading exceeds 8%).


